
0xFF 音乐台
以后应该搞一个网络电台?
0x00
我这小电脑有一个来自汇顶科技的指纹模块:
Bus 003 Device 004: ID 27c6:55a2 Shenzhen Goodix Technology Co.,Ltd. Goodix FingerPrint Device但很遗憾,libfprint项目并没有它的驱动。
那以后呢?
也不太可能有。
不过,网上冲浪时倒是找到一个用Python写的PoC:https://blog.th0m.as/misc/fingerprint-reversing/
简单来说,这款指纹模块使用了TLS over USB,通过重写PSK可以抓到指纹传感器的raw image: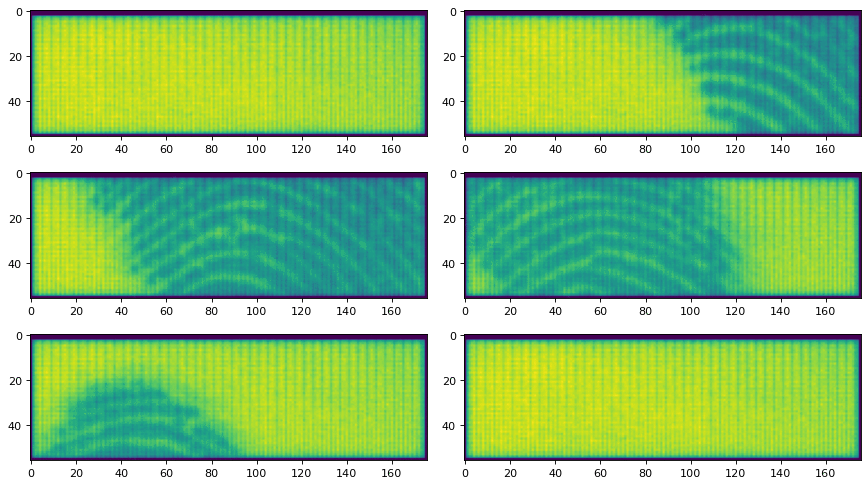
可问题是,从指纹传感器抓到的原始图像包含很多细条纹,经过前段时间的测试,这些细条纹在libfprint里将严重干扰NBIS的指纹匹配算法,我们需要去噪。
我们看一看联想的厂商驱动是怎么做的去噪吧。同时感谢Th0mas的研究提供了该指纹驱动的USB命令与TLS初始化部分的运行逻辑,我们将直接在Th0mas的PoC上进一步分析获取原始图像后厂商驱动的降噪算法。
0x01 Reverse it
从联想官网获取到指纹驱动安装包后使用innoextract提取安装包文件,里面同时包含汇顶和Elan的指纹驱动,在Source/3.1.57.310里面的是汇顶驱动。
在WbdiUsb.inf内可以发现是Wbdi.dll在处理指纹通讯。
[usbinterface_Install]
UmdfLibraryVersion=2.15.0
ServiceBinary=%12%\UMDF\wbdi.dll
在IDA里这样那样操作一番,可以发现:
驱动在Realtek后端装载work-item后沿_McuParsePackage,FpParseImage进入SgxFpParseImage分支,随后在ImageRestructInterface内命中SensorType == 2分支:
    case 2:
      v5 = ImageRestructMilanG(a1: a3, (__int64)a2, a3: SensorType, a4: 1u, a5: 0, a6: 0);
      if ( v5 != 0 )
      {
        result = v5;
      }
      else
      {
        Block = (void *)sub_1800C68D0(Size: 2 * *(unsigned __int8 *)(SensorType + 65)
                                              * *(unsigned __int8 *)(SensorType + 64));
        if ( Block != nullptr )
        {
          qmemcpy(Block, a2, 2 * *(unsigned __int8 *)(SensorType + 65) * *(unsigned __int8 *)(SensorType + 64));
          transpose_u16_image(
            a1: (__int64)Block,
            (__int64)a2,
            a3: *(unsigned __int8 *)(SensorType + 64),
            a4: *(unsigned __int8 *)(SensorType + 65));
          memset(Block, 0, 2 * *(unsigned __int8 *)(SensorType + 65) * *(unsigned __int8 *)(SensorType + 64));
j_free_0(Block);进入ImageRestructMilanG后,
typedef struct MilanGImageConfig {
    uint32_t sensor_type;          // +0x00,GF3206 为 2
    uint8_t  reserved_04[0x3c];
    uint8_t  source_rows;          // +0x40,GF3206 为 176
    uint8_t  pixels_per_row;       // +0x41,GF3206 为 54
} MilanGImageConfig;

__int64 __fastcall ImageRestructMilanG(
        char *WireImage,
        __int64 DstPixels,
        MilanGImageConfig *ImageConfig,
        unsigned int RowGroupParameter,
        int isRowPaired,
        int RowOrderMode)
{
// ......
CopiedRowBytes = 3 * ImageConfig->pixels_per_row / 2 + 1; // 每行保留字节数 = 3*54/2 + 1 = 82
WireRowStride = 3
                * (ImageConfig->pixels_per_row + 2)
                * ImageConfig->source_rows
                / 2
/ (unsigned __int64)ImageConfig->source_rows; // Wire输入跨度 = 3*(54+2)/2 = 84具体研究发现对于GF3206,isRowPaired = 0,所以
  PackedRowsSize = ImageConfig->source_rows * CopiedRowBytes; // 82*176=14432
  CopyDst = (char *)sub_1800C68D0(Size: PackedRowsSize);
  if ( CopyDst == nullptr )
    return 0xFFEFFFFBLL;
  PackedRows = CopyDst;
  if ( isRowPaired != 0 )  // isRowPaired == 0
  {
    // ......
  }
    else
  {
    for ( j = 0; j < ImageConfig->source_rows; ++j )
    {
      qmemcpy(CopyDst, WireCursor, CopiedRowBytes);
      WireCursor += WireRowStride;
      CopyDst += CopiedRowBytes;
    }
    LinearDecodeOffset = 0;
    while ( LinearDecodeOffset < PackedRowsSize )
    {
      *(_WORD *)(DstPixels + 2LL * DstPixelIndex) = (unsigned __int8)PackedRows[LinearDecodeOffset + 1]
                                                  + ((PackedRows[LinearDecodeOffset] & 0xF) << 8);
      *(_WORD *)(DstPixels + 2LL * (DstPixelIndex + 1)) = ((int)(unsigned __int8)PackedRows[LinearDecodeOffset] >> 4)
                                                        + 16 * (unsigned __int8)PackedRows[LinearDecodeOffset + 3];
      if ( DstPixelIndex % 0x36 == 52 )         // 从第52列开始,只解码两个像素;实际上写死了GF3206的行宽
      {
        DstPixelIndex += 2;
        LinearDecodeOffset += 4;
      }
      else
      {
        *(_WORD *)(DstPixels + 2LL * (DstPixelIndex + 2)) = (unsigned __int8)PackedRows[LinearDecodeOffset + 2]
                                                          + ((PackedRows[LinearDecodeOffset + 5] & 0xF) << 8);
        *(_WORD *)(DstPixels + 2LL * (DstPixelIndex + 3)) = ((int)(unsigned __int8)PackedRows[LinearDecodeOffset + 5] >> 4)
                                                          + 16 * (unsigned __int8)PackedRows[LinearDecodeOffset + 4];
        DstPixelIndex += 4;
        LinearDecodeOffset += 6;
      }
    }
  }
  memset(PackedRows, 0, PackedRowsSize);
  j_free_0(Block: PackedRows);
// ......具体来说,在ImageRestructMilanG里面:
- 输入176行,每行84字节
- 每行复制前82字节,丢弃最后2字节
- 每行解码13组6字节→4像素
- 从第52列开始,4字节→2像素行尾
- 完成后输出连续的
uint16_t[176][54]像素
ImageRestructMilanG流程结束后由transpose_u16_image将uint16_t[176][54]转置为uint16_t[54][176]。
随后ImageRestructInterface流程结束后,沿原路径返回_McuParsePackage回调EvtImage进入PreprocessSwipeImage,PreProcessorUnify,一路进入sub_1800E9D40。这里没有原厂调试日志输出,我们后面叫它WbdiPpPipeline。这里是对原始图像进行预处理的一整套管线,下有很多处理功能:
pp_compute_quality_coverage
pp_reset_error
pp_recalibrate_bad_pixel_state
pp_refresh_bad_pixel_calibration
pp_update_bad_pixel_state
pp_classify_bad_pixels
pp_local_minmax_filter_pass_b
pp_local_minmax_filter_pass_a
pp_memmove
pp_memzero
pp_alloc_image_object
pp_free_image_object
pp_build_validity_mask
pp_measure_mask_quality_a
pp_rebuild_calibration_maps
pp_update_offset_gain_and_gate
pp_measure_mask_quality_b
pp_quality_gate_and_retry
pp_clamp_u12_repair_edges
pp_copy_and_scale_reference_plane
pp_validate_calibration_map
pp_build_calibration_maps
pp_merge_minmax_maps
pp_apply_q13_gain_correction
pp_generate_q13_normalized_planes
pp_prepare_q13_gain_thresholds
pp_initialize_baseline_calibration
pp_scale_image
pp_clear_working_image
pp_compare_quality_masks
pp_finalize_diagnostics
一共31个。稍微捡几个核心的功能做了就差不多得了,把31个全做完要累死。
具体来说,在接下来的poc里我只实现了baseline校准和部分q13算法。
具体的厂商代码就不放了,直接看下面的poc。
0x02 Python PoC
在Th0mas的PoC基础上,根据联想原厂实现用Python重写一下。
def _unpack_four_pixels(chunk):
    """ImageRestructMilanG内6字节到4像素转换"""
    return (
        ((chunk[0] & 0x0f) << 8) | chunk[1],
        (chunk[3] << 4) | (chunk[0] >> 4),
        ((chunk[5] & 0x0f) << 8) | chunk[2],
        (chunk[4] << 4) | (chunk[5] >> 4),
    )

def unpack_wire_row(row):
    """84字节原始输入转54个像素"""
    pixels = []
    # 13组占78字节产生52像素
    for offset in range(0, 78, 6):
        pixels.extend(_unpack_four_pixels(row[offset:offset + 6]))
    # 行尾
    tail = row[78:82]
    pixels.append(((tail[0] & 0x0f) << 8) | tail[1])
    pixels.append((tail[3] << 4) | (tail[0] >> 4))
    return np.asarray(pixels, dtype=np.uint16)

def unpack_packed_frame(data, algorithm_layout=True):
    """输出176x54原始像素或转置图像"""
    wire_image = np.stack(
        [
            unpack_wire_row(data[offset:offset + WIRE_ROW_BYTES])
            for offset in range(0, len(data), WIRE_ROW_BYTES)
        ]
    )
    return wire_image.T.copy() if algorithm_layout else wire_image
def build_flat_field_calibration(empty_frames):
"""初始化建立baseline校准和q13 gain map"""
empty_frames = list(empty_frames)
if not empty_frames:
raise ValueError("?")
frames = np.asarray([_as_algorithm_image(frame) for frame in empty_frames])
if frames.ndim != 3:
raise ValueError("?")
#对每一个像素位置分别计算时间维中位数
baseline = np.rint(np.median(frames, axis=0)).astype(np.uint16)
'''
B[y][x] = median(
frame_0[y][x],
frame_1[y][x],
frame_N-1[y][x])
'''
kr_q13 = np.full(baseline.shape, Q13_ONE, dtype=np.uint16)
# Q13_ONE = 1 << 13 = 8192
# 把实数比例乘以8192存储。这里使用厂商Q13默认值,我们只有空场帧,没有厂商夹具或者什么均匀导电材料去做标定
return baseline, kr_q13初始建立好校准数据后,我们就可以在运行时校正图像:
def apply_vendor_flat_field(raw, baseline, kr_q13):
    """运行时校正"""
    raw = _as_algorithm_image(raw).astype(np.int32)
    baseline = _as_algorithm_image(baseline).astype(np.int32)
    kr_q13 = _as_algorithm_image(kr_q13).astype(np.int64)

    signal = np.maximum(baseline - raw, 0).astype(np.int64)
    # signal[y][x] = max(B[y][x] - R[y][x], 0)
    # 对于此传感器,指纹接触后的响应表现为raw相对空场baseline下降,因此需要使用base-raw这个方向
    denominator = np.where(kr_q13 > 0, kr_q13, Q13_ONE)
    corrected = (signal * Q13_ONE + denominator // 2) // denominator
    # corrected = round(signal * 8192 / kr_q13) = round(signal * 8192 / 8192) = signal,所以实际上我们什么也没修改,只有真正完成q13 gain map标定后才有用,预留个坑先
    # 不过厂商都是统一填的8192
    return np.clip(corrected, 0, 4095).astype(np.uint16)  # 12bit
也就是说其实作出的改动只有baseline修正。
添加好上述逻辑后,将原poc对接到新加的逻辑上,完成初始校准后开始实时抓图: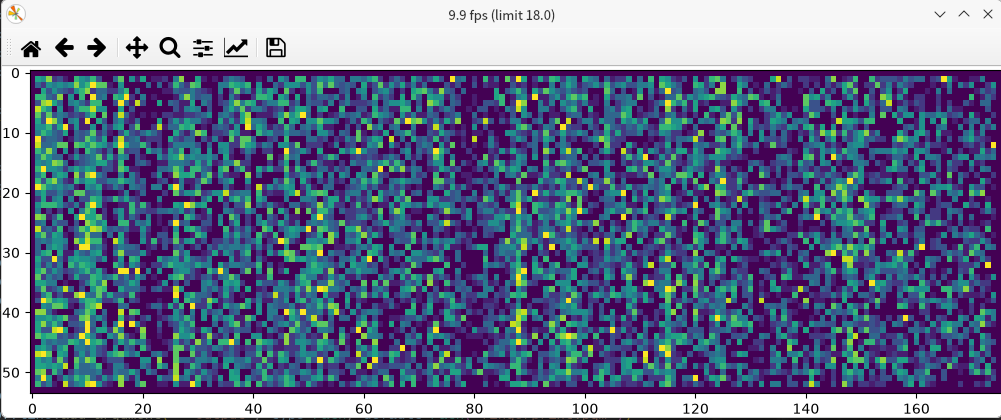
输入空帧时经baseline校正后可以看到细竖线消失了,只剩下环境噪声。由于我做了min-max归一化,噪声看着很吵,正常现象。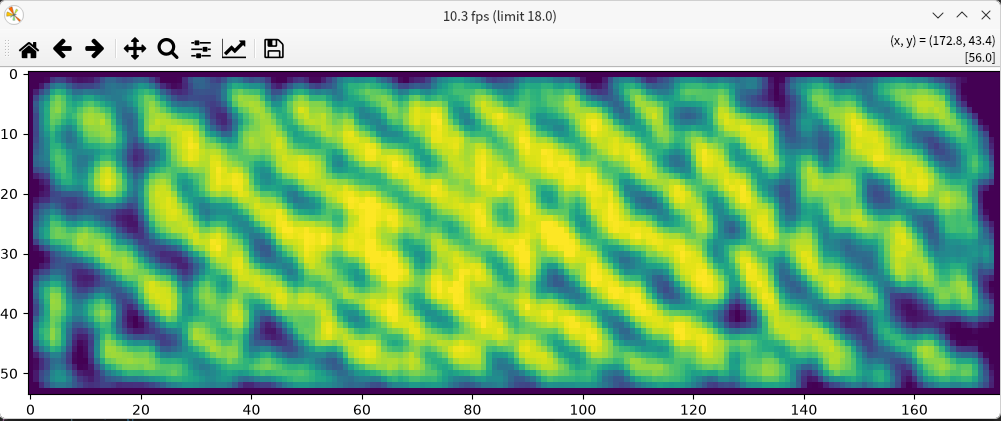
按压指纹(为防止指纹泄漏,这里按的是我的指肚)后,可以发现得到了非常干净的指纹图像。
0x03 AI赋能
Python PoC看着效果很不错,该移植到libfprint上了。
但是我不是很熟C语言开发怎么办😨?
AI真是太好用了你们知道吗
经过一段时间的操作,GPT-5.6 Sol洋洋洒洒写了2500多行的驱动代码和单元测试。你可以在https://github.com/ElvinStarry/libfprint下载这段驱动代码。
具体逻辑应该是和Python PoC差不多的,需要注意的是这个指纹模块只有176x54像素,对libfprint的NBIS模块来说是远远不够的。所以,这个驱动是滑动式的,在录入和识别时需要把你的整个手指滑过采集区域,采集你的整个指纹。
来测试一下。
meson compile -C build-default
meson test -C build-default --print-errorlogs
It's now time to enroll your finger.
You will need to successfully scan your right index finger 5 times to complete the process.
Scan your finger now.
Wrote scanned image to enrolled.pgm
Enroll stage 1 of 5 passed. Yay!
Wrote scanned image to enrolled.pgm
Enroll stage 2 of 5 passed. Yay!
Wrote scanned image to enrolled.pgm
Enroll stage 3 of 5 passed. Yay!
Wrote scanned image to enrolled.pgm
Enroll stage 4 of 5 passed. Yay!
Wrote scanned image to enrolled.pgm
Enroll stage 5 of 5 passed. Yay!Opened device. Gallery loaded. Time to identify!
Print image saved as identify.pgm
IDENTIFIED!
Identify again? [Y/n]? y
Gallery loaded. Time to identify!
Print image saved as identify.pgm
IDENTIFIED!
Identify again? [Y/n]? n稳定识别。效果不错。
然后安装到系统全局。因为我的archlinux没有安装过fprintd,最好是先安装一下官方包然后覆盖安装。
meson setup build-system \
  --prefix=/usr \
  --libdir=lib \
  --buildtype=release \
  -Ddrivers=default \
  -Ddoc=false \
  -Dinstalled-tests=false \
  -Dgtk-examples=false \
  -Dwerror=true

meson compile -C build-system
meson test -C build-system --print-errorlogs
sudo systemctl stop fprintd.service
sudo meson install -C build-system
sudo ldconfig
sudo udevadm control --reload
sudo udevadm trigger --subsystem-match=usb
sudo systemctl restart fprintd.service再测试一下:
[elvinstarry@ElvinArch ~]$ fprintd-enroll -f right-index-finger elvinstarry
Using device /net/reactivated/Fprint/Device/0
Enrolling right-index-finger finger.
Enroll result: enroll-stage-passed
Enroll result: enroll-stage-passed
Enroll result: enroll-stage-passed
Enroll result: enroll-stage-passed
Enroll result: enroll-stage-passed
Enroll result: enroll-completed
[elvinstarry@ElvinArch ~]$ fprintd-verify elvinstarry
Using device /net/reactivated/Fprint/Device/0
Listing enrolled fingers:
 - #0: right-index-finger
Verify started!
Verifying: right-index-finger
Verify result: verify-match (done)
然后配置一下PAM:
#%PAM-1.0
auth       sufficient   pam_fprintd.so max-tries=3 timeout=10
auth       include      system-auth
account    include      system-auth
session    include      system-auth
session    optional     pam_systemd.so class=none
在新终端测试:
[elvinstarry@ElvinArch ~]$ sudo whoami
请把您的右手食指划过指纹读取器
root
[elvinstarry@ElvinArch ~]$
good。